I recently surpassed the 100 follower mark so I have decided to do my first official giveaway. I am giving away a $10.00 Gift Certificate to Amazon.com. This is not a sponsored giveaway. It is a reward I got and I am giving it to one of my readers. The contest will end August 10, 2010 at 11:59 pm EST. If you win, you must respond to the email within 48 hours or another winner will be picked. I will send the winner the claim code so they will have immediate access to the gift certificate.
It is pretty easy to enter:
You must publicly follow me and leave a comment saying you do along with your email address.
Extra Entry:
Blog about my giveaway on your blog and leave me a link to the actual post. Be sure to leave your email address.
Good Luck!!
Friday, July 30, 2010
I finally won a contest!!
YES, I finally won a contest over at Sugar Pop Ribbons. I won this yummy looking Deluxe Apple Gift Box from California Caramel Company. I don't think I will tell my husband and kids so I can have them all to myself (insert evil laugh here)!!
Tuesday, July 27, 2010
Saturday, July 10, 2010
Paint Project #2: Breakfast Room Light Fixture
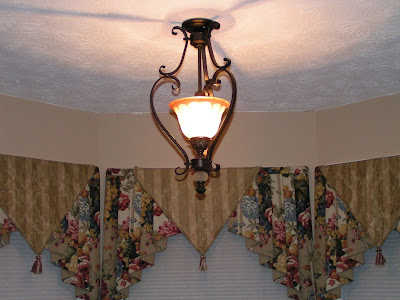
Well, I bought the light fixture for the breakfast room to replace to builder gold basic one that you see above. It matches the light fixture in my dining room. I got a good deal on this one as well at Lowe's. It ended up costing me about $25.00. It wasn't as great a deal as the other light but still a good deal. You probably guessed that I painted it my trusty Krylon Oil Rubbed Bronze. My husband kids that he is going to come home one day and the boys will be oil rubbed bronze in color because I decided they would look better that way :) So without further delay, here is the final result.
Wednesday, July 7, 2010
Paint Project 1: Dining Room Light Redo
I have hated this light fixture ever since I first saw it. It was that new build gold basic light fixture. I finally got around to replacing it. I was so excited about replacing it that I forgot to take a picture of the before. It was exactly like the picture above that I got off the Krylon site. You can see my old fixture in the mirror of the second picture and in the right hand corner as well. I was trying my best not to get it in this picture :) The fixture had two lights that wouldn't work and the rings on the bottom of the light were always moving around from the boys touching them.
Anyway, we were at Lowe's one Saturday doing a project with the boys and decided to look at lights. We found the light above on clearance. It had been $178.00 but was reduced to $43.88. We had a $10.00 off coupon the boys had gotten with their Father's Day Frame they made at Lowe's. So, the final cost with tax was less than $35.00. Not bad, huh?! BUT, I didn't like the color so I got my trusty Krylon Oil Rubbed Bronze spray paint and transformed it. I also hated seeing the chain so I made a chain cover out of extra fabric. I know it is OCD but you have to admit it does look better than the chain. I still want to touch up the edges with a little aged old rub but pretty much it is finished. Below are the pictures of the final product. I just love it! It has a matching fixture that I am also painting to go over my breakfast table. I will post pictures of that redo soon.
Anyway, we were at Lowe's one Saturday doing a project with the boys and decided to look at lights. We found the light above on clearance. It had been $178.00 but was reduced to $43.88. We had a $10.00 off coupon the boys had gotten with their Father's Day Frame they made at Lowe's. So, the final cost with tax was less than $35.00. Not bad, huh?! BUT, I didn't like the color so I got my trusty Krylon Oil Rubbed Bronze spray paint and transformed it. I also hated seeing the chain so I made a chain cover out of extra fabric. I know it is OCD but you have to admit it does look better than the chain. I still want to touch up the edges with a little aged old rub but pretty much it is finished. Below are the pictures of the final product. I just love it! It has a matching fixture that I am also painting to go over my breakfast table. I will post pictures of that redo soon.
Labels:
dining room,
paint,
redo
Friday, July 2, 2010
Teddy Grahams' Day at the Beach
Ok, so I know the title is a little goofy but I am open to suggestions for a better one. This a treat I made for my son's Pre-K Graduation Picnic. I didn't have a blog at the time so I don't have have pictures of the pudding by itself. For this treat you need:
* White Chocolate Instant Pudding Mix (or similar pudding that is white) & ingredients to make it
* Gel Food Coloring - mine was Neon Gel Colors (you can use regular colors but the gel works best)
* White Cake Mix & ingredients to make it* Teddy Grahams
* Gummy Lifesavers
* Drink Umbrellas - I got mine at Dollar Tree
* Container - Again, mine came from Dollar Tree...I just love that store!!
Make pudding according to package instructions. Add your blue coloring to the pudding to get the color of "water" you desire. Let it chill in the refrigerator for a few hours before assembly.
Make the cake according to the instructions. Be sure to use the egg whites only to make your colors more vibrant. As you can see from the picture above, the neon colors really pop in the white cake batter. A couple of tips to speed clean up and make the mixing super easy: put quart size Ziplock bags in cups that are all the same size and fold the top over the edges. Add the cake mix evenly in the cups and add the different colors to each. Zip up the bag, cut off the corner and spread cake mix in pan. This works great especially if you are making cupcakes with multiple colors in them. While the cake is cooling, grind up part of your Teddy Grahams in a food processor. These crumbs will be the "beach".
Finally, assemble. Break up the cake in small pieces and put into your cup/container then fill to top with pudding "water". You can do the cake and pudding in advance and keep them in the refrigerator but they look best if done a couple of hours in advance. The pudding will seep slightly into the cake if you do this step the night before. Trust me, I know. Mine still looked good and no one else knew BUT I did! Add a little Teddy "sand" on one side, stretch the Gummy Lifesaver around the Teddy Graham as his life preserver and insert in pudding " water". Add the umbrella and there you have it...a Teddy Grahams' Day at the Beach!
Labels:
beach,
cake,
dessert,
pudding,
teddy grahams
Subscribe to:
Comments (Atom)

